Draw a figure of Paper Flower Pot or take any show piece available with you. Now draw the dividing lines (FIG-A).
A Paper Flower Pot can de divided into -
Top Face (Orange Color in Fig)
Neck (Red color in Fig)
Main Body (Blue color in Fig
Base (Red Color in Fig
- Check the black cut marks on different pieces(Fig-A & Fig-C). Apply some glue and re-join the cut marks after 2-3 mm overlapping. This will give elevated and sunken look to various pieces.(This is a important step-do it carefully)
Main Body :- Cut approx 16 pieces of paper for making the main body of paper pot. The length , top and bottom dimensions depends on the size of Flower pot. Make 3-4 mm cut to all the pieces
at a place you want to bend it (Refer FIG-B). Now we have given joining point on one side of all 16 pieces. start joining them (FIG-B) and complete the pot body.
Neck :- Take a rectangular piece of paper and fold make a cylinder like shape. Now as shown in FIG-C make joining cuts and fix it to the flower pot body. Bend Upper part of cut edges
of neck at 90 degree.
Top face :- Cut a circular piece as shown in Fig-C. (The size of diameter should be 10% more than the actual required). Now join the black cut mark by
overlapping to give elevated and sunken look alternately.
Base :- Make the simple base of paper pot with the help of a rectangular and circular piece of paper and fix with the previous assembly.
Put some small stone inside the pot to make it stable on table.
Your Paper Flower pot is ready. Decorate with artificial flowers
See more paper models on Technique Paper Models (How to make Paper Flower Pot )
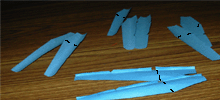 Fig-A
Fig-A
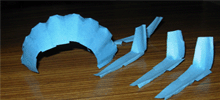 Fig-B
Fig-B
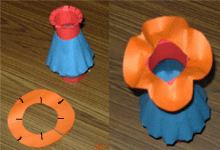 FIG-C Fig-D