To make origami paper animals first draw a figure of animal or take any animal available with you. Now draw the dividing lines (FIG-A).
A DUCK can de divided into -
TWO sides (piece 'A' in FIG-A & FIG-B)
Two Bottom (piece 'B' in FIG-A & FIG-B)
Tail (piece 'C' in FIG-A & FIG-B)
back (piece 'D' in FIG-A & FIG-B)
Beak (piece 'E' in FIG-A & FIG-B)
etc.
Please note that few pieces are having the cut edge (this is additional portion) for joining the two pieces. You may have joining area in all
the pieces and remove (cut) the extra joining portion at the time of joining. (we also have left some extra joining area in some pieces, which you
will notice at the time of actual fixing/joining the pieces.
It's good idea for bigners to cut the pieces with waste paper to finalize the shape and size of of paper animal.
- Check the black cut marks on different pieces. Apply some glue and re-join the cut marks after 2-3 mm overlapping. This will give elevated and sunken look to various pieces.(This is a important step-do it carefully)
- Join the two sides pieces (both the A pieces). Only the top edge to be glued as shown in FIG-C
- Join the D piece (i.e. Back side) with previous assembly). (FIG-D) You may find difficult to join this piece, because of it's long length. Use a thin stick to apply
required presser on joining edge.(FIG-E)
- Join the B pieces on both the sides with previous assembly.
- Join C piece with previous assembly.
- Make a Beak and join the assembly already made.
Your Paper Animal - origami DUCK is ready
See more How to make Origami on Technique Paper Models (How to make Origami Duck)
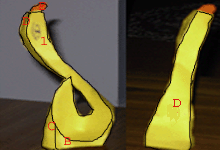 Fig-A
Fig-A
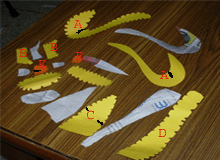 Fig-B
Fig-B
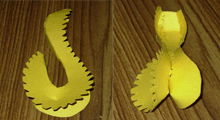 FIG-C Fig-D
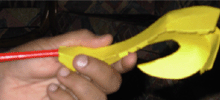 FIG-E
FIG-E