The paper Bicycle model making can de divided into -
Front & Back , Front & Back Rim , Front & Front & Back axle, Front & Back Mud
Guard, Front & Back Frame , various Joining Rods, Seat , Carrier , chain , Paddle set, Gear set etc. Paper bicycle model will be
made by assembly these small paper models
1) FRONT & BACK Wheel : -
i) TYRE :- Cut two circular piece of paper for each tyre of paper bicycle model as shown in FIG-B.
Make three concentric circles. The outer most diameter is 3 mm more than the diameter of the actual tyre.
The second diameter is of the tyre size. Now make some cut between outer ring and middle ring as shown
in FIG-B. This portion will be used for joining different pieces. cut the Cut two rectangular pieces for tyre circumference. The length of the piece should
be 4 mm more than tyre circumference.
Take all pieces of tyre and bend all cuts to right angle.
Take one piece of tyre and one rectangular piece and start joining them as shown in the FIG-G. Now take other piece of tyre and join it with the previous assembly.
Repeat this for other tyre also. Now You will have paper model of two tyres as shown in FIG-H
ii) RIM & Spokes :- First decide the shape (look). Cut four pieces (brown piece in FIG-A) of paper. The outer diameter should be 3 mm more than the size of paper bicycle tyre.
Join two pieces together (leaving 3 mm from the outer diameter). Bend the 3 mm left over portion to left and right. Now you will have
some thing like shown in FIG-H.
iii) axle & Back Gear :- for axle cut rectangular piece of any color paper and for Gear cut circular piece and then cut from it's outer diameter to give it a Gear like shape.
(FIG-E). For making axle, glue it at one corner of rectangular piece and make a tube like structure. For giving it a circular shape, you may use a pencil and round stick.
iv) Sub-Assembly of paper bicycle model :- Take paper models of Rim & Spokes and apply glue on it's outer diameter left over portion ( 3 mm left right folded portion of our earlier step).
Place it inside the tyre and with the help of hand/stick apply small pressure on the glued portion. Make a hole in the center of Rim/Spoke and after applying a bit of glue on the hole, insert the axle. Fix the Gear for Back wheel.
Your 1st assembly of Front & Back Wheel is ready (FIG-J)
2) Mud Guard :- For making side of mud guard cut 4 semi circular piece of paper with diameter more than 10 mm from wheel diameter. Make cut marks as shown in FIG-C. Cut 2 rectangular pieces for main body of mud guard.
Now glue 2 semi circular piece with 1 rectangular piece 9as you did for tyres). You will have mud guards as shown in FIG-J
3) Seat Cover :- Cut the paper pieces as shown in FIG-D. Mark the lines shown in figure and cut marks on outer sided. Now bend all the cut on one side to give it a seat like shape. You will find that
bended portion are getting slightly over lapped. Apply glue on over lapped portion of cut marks and join them. Your paper model of seat is ready
4) Handle :- Cut the paper piece as shown in FIG-D (Orange color).Apply glue (apprx of 1 mm width) on it's longer side and roll it to form a cylindrical shape. You will find two cut at both the ends. This is for giving it a shape of handle. Apply glue on these cut mark and bend it
at 90 degree. Hold it for some time so that it gets fixed. The handle of paper bicycle is ready.
5) Paddle :- Cut 2 black (for foot rest) and two white pieces of paper for paddle body (FIG-E). Now make paddle body as you have made handle and fix the foot rest.
6) Main Frame :- Cut various piece of paper as shown in FIG-F (size you have to decide. Roll it to form cylindrical shape and glue it.
7) Other items :- Make the paper models of handle grip, carriers etc. as per your design.
8) Assembly :- Now fix the various paper models pieces in a logical sequence (FIG-K & FIG-L) to complete the Paper Bicycle model.
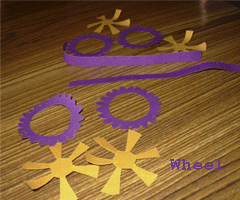
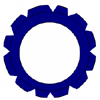 Fig-A Fig-B
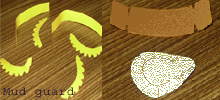 FIG-C Fig-D
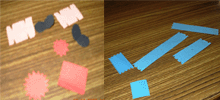 FIG-E Fig-F
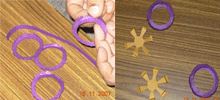 FIG-G Fig-H
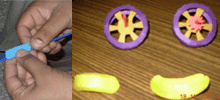 FIG-I Fig-J
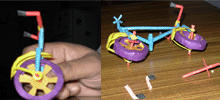 FIG-K Fig-L